Friday 30 March 2018

Hello World Xamrin Android project tutorial

Background

Xamrin are set of tools built on .NET framework . It allows you to develop applications for Android, iOS and Windows using C# language and the .NET framework.In this post I am going to show you how to develop a native android application using xamrin.

Setup

For this tutorial you need to have Visual Studio with Xamrin components installed on your Windows operating system. You can get it from Visual Studio installer. Or from Visual Studio you can go to Tools -> Get Tools and Features.


 Hello World Xamrin Android project tutorial

Click on File -> New Project  and choose Blank App(Android)

 One you have created the project you should see following code structure -


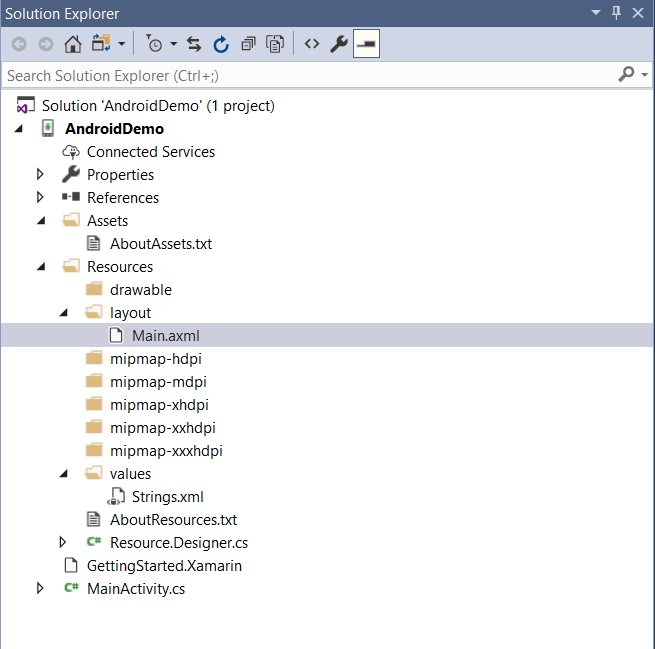
 Let's go over some of the important files here -
  1. MainActivity.cs : This is your main launcher activity.
  2. Resources/layout/Main.axml : This is your launcher ctivity layout file
  3. Resources/values/String.xml : This is your string resource file.
Go to  Resources/layout/Main.axml and add a EditText and a Button to the Linear Layout that you have. You can do that from  Designer mode with just drag and drop.


Change the id of EditText and Button to "helloWorldeditText" and "ckickMeButton" respectively. So your source would look like -

<?xml version="1.0" encoding="utf-8"?>
<LinearLayout xmlns:android="http://schemas.android.com/apk/res/android"
    android:orientation="vertical"
    android:layout_width="match_parent"
    android:layout_height="match_parent">
    <EditText
        android:layout_width="match_parent"
        android:layout_height="wrap_content"
        android:id="@+id/helloWorldeditText"
        android:text="Hello World!" />
    <Button
        android:text="Click Me!"
        android:layout_width="match_parent"
        android:layout_height="wrap_content"
        android:id="@+id/ckickMeButton" />
</LinearLayout>
Now go to MainActivity.cs and make following changes. We are basically going to implement a button and  change the text of EditText on the click of the button.
using Android.App;
using Android.Widget;
using Android.OS;

namespace AndroidDemo
{
    [Activity(Label = "AndroidDemo", MainLauncher = true)]
    public class MainActivity : Activity
    {
        protected override void OnCreate(Bundle savedInstanceState)
        {
            base.OnCreate(savedInstanceState);

            // Set our view from the "main" layout resource
            SetContentView(Resource.Layout.Main);
            EditText helloWorldEditText = FindViewById<EditText>(Resource.Id.helloWorldeditText);
            Button clickButton = FindViewById<Button>(Resource.Id.ckickMeButton);
            helloWorldEditText.Text = "Hello World!";
            clickButton.Click += delegate { helloWorldEditText.Text = "Button Clicked!"; };
        }
    }
}


Notice the resource IDs we changed and use to reference it in the code. And that's it. Just deploy the code to an android device or an emulator and test our changes.


Related Links


Sunday 18 March 2018

How To Set Up an HTTPS Service in IIS

Background

Windows provides Internet information service (IIS) to host your local applications on your windows machine. You need to enable IIS from "Turn Windows features on or off".


Once you have done that you can add an application to it and get started. I have created a youtube video to demo the same -


This video shows how to set up a simple website on IIS and also add https support. I am also going to show how to add https support part in this post.

How To Set Up an HTTPS Service in IIS

First, make sure you have self-signed certificate generated in your IIS manager. To do that go to "Server certificates" in your machine home node inside your IIS manager -


Next, double-click the "Server Certificates" section and make sure a self-signed certificate exists. 


If no certs exist for localhost go ahead and create one using "Create self-signed Certificate". 

Once you have the certificate go to Sites in the navigation panel on the left and click on Default website under sites.


Next, click on "Bindings" in the section on the right and add https binding. Make sure you select correct SSL certificate in the process that we create in previous steps.


Once you are done just click ok and you should have https binding set for your website.


Now you can open your website with https protocol.


Related Links

Sunday 11 March 2018

AngularJS Routing Using UI-Router

Background

In the last post, we saw AngularJS Hello World example. In this post, we will see how we can create an angular JS app with routing using UI-Router module. If you have not read the previous post I would highly recommend you read that first.


 Setup

There is a small change in the file structure than our previous example. Create files as shown in the following screenshot -


Following are file details -
  • helloWorld.html : Our main HTML file. Starting page similar to the last example.
  • helloworld.module.js : Declares angular module and it's dependencies
  • helloWorld.controller.js : Controller for the module
  • helloworld.config.js : Config for the module.  
  • login.html : login page to route to
  • setting.html : setting page to route to
 Also make sure you install http-server module to host your angular app and test it -
  • npm install -g http-server


Then you can simply run in your project directory as -
  • http-server -o 
NOTE : -o option is to open browser.

AngularJS Routing Using UI-Router


Now let's see one by one content of each file. Let's start with  helloWorld.html -

<html>
    <head>
        <title>Hello World!</title>
        <script type="text/javascript" src="https://ajax.googleapis.com/ajax/libs/angularjs/1.2.26/angular.min.js"></script>
            <script src="//cdnjs.cloudflare.com/ajax/libs/angular-ui-router/0.2.8/angular-ui-router.min.js"></script>
            <script type="text/javascript" src="helloworld.module.js"></script>
        <script type="text/javascript" src="helloWorld.controller.js"></script>
        <script type="text/javascript" src="helloworld.config.js"></script>
    </head>
    <body ng-app="helloWorldApp">
        <div ng-controller="helloWorldAppController" ng-init="init()">
                  <p>Enter Message here : <input type="text" ng-model="message"></p>
                   <p>Entered Message :  {{ message }}!</p>

                   <a href="/login">Login</a> <br/>
                   <a href="/setting">Setting</a>

                <div class="content-wrapper">
                    <ui-view></ui-view>
                </div>    
        </div>
    </body>
</html>


In this base HTML file we have just referenced other angular JS files that we need. An interesting thing to note here is the ui-view tag. This is where the injected code goes. But we will see that in a moment.


Let's see out module and controller files next -


helloworld.module.js

(function() {
    'use strict';
    console.log("In hello world module");
    angular.module('helloWorldApp', ['ui.router']);
})();


This code just declares your module as we did in last example. Only change is that it has an additional dependency on ui.router module. Note we have included a new script in helloWorld.html to get code for this module.


helloWorld.controller.js

(function(){
    'use strict';
    console.log("In hello world controller");
    angular.module("helloWorldApp").controller("helloWorldAppController", function($scope) {
        $scope.init = function() {
            console.log("Init method called");
            $scope.message = "Hello World!";
        }
    });

})();


This is a controller of the module we defined. This is again same as we did in last post. No new changes here.


Now let's see our new logic - helloworld.config.js


(function() {
    'use strict';
    console.log("In hello world config");
    angular.module('helloWorldApp').config([
        '$stateProvider',
        '$urlRouterProvider',
        function($stateProvider, $urlRouterProvider) {
            $stateProvider.state('login',{
                     url: "/login",
                     templateUrl: "login.html"
                })
            .state('settings',{
                    url: "/setting",
                    templateUrl: "setting.html"
            });
        }
    ]);
})();


This is actually the routing logic. For eg. if it encounters URL "/login" it will render page "login.html" that we have in same folder. Same for setting.html.


Finally, let's see out login.html and setting.html files -


login.html -


<h1>This is a login page!</h1>
<a href="/helloWorld.html">Back</a>


setting.html -


<h1>This is a login page!</h1>
<a href="/helloWorld.html">Back</a>


 Once you have all files in place just run http-server as follows -


And you should see following behavior - 


But wait what happened? I thought the code was supposed to be injected at tag ui-view.

This is because we do not actually use angular routing per say to change the state. Let's do some changes to see how we can do that. Change your login href as follows - 

<a href="" ng-click="replaceLoginPage()">Login</a>


and now add this method to the controller -


(function(){
    'use strict';
    console.log("In hello world controller");
    angular.module("helloWorldApp").controller("helloWorldAppController", function($scope, $state) {
        $scope.init = function() {
            console.log("Init method called");
            $scope.message = "Hello World!";
        }

        $scope.replaceLoginPage = function() {
            console.log("In replaceLoginPage");
            $state.go("login");
        }
    });

})();


And now it should replace ui-view tag.


Related Links


t> UA-39527780-1 back to top